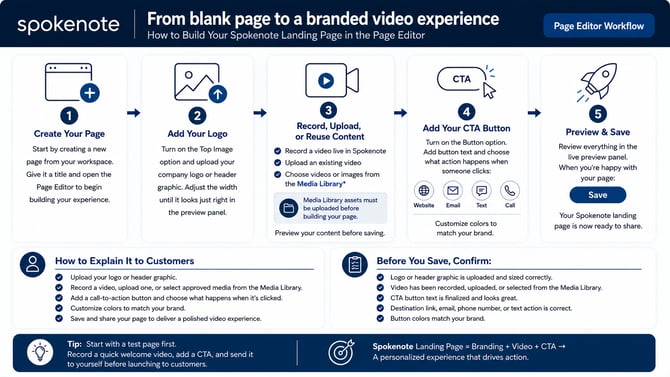
Ready to create a video experience your audience will actually want to interact with? The Spokenote Page Editor lets you build a branded video landing page in just a few minutes—no design degree required.
Follow these simple steps to create your page from start to finish.
Step 1: Add Your Company Logo or Header Graphic
Start by turning on the Top Image toggle.
This allows you to add your company logo, campaign banner, or header image to the top of your landing page.
💡 Pro Tip: Your logo is often the first thing visitors see. A little branding goes a long way.
Step 2: Upload Your Header Graphic
Click Choose File and select an image from your computer.
Supported examples include:
- Company logos
- Campaign graphics
- Event banners
- Product images
As soon as the image uploads, you'll see a preview on the right side of the screen.
Step 3: Adjust the Logo Size
Use the Max Width field to resize your logo or header image.
Watch the live preview panel on the right to see how it will appear to visitors.
Find the sweet spot between "professional" and "taking over the entire page."
Step 4: Choose How You'll Add Your Video
Now for the fun part.
You have two options:
Option A: Record a Video
Click Record to create a video directly inside Spokenote using your computer's webcam and microphone.
Perfect for:
- Welcome videos
- Thank-you messages
- Personalized outreach
- Quick updates
Step 5: Record Your Video
When you're ready:
- Position your camera
- Smile 😄
- Click the red Record button
Your recording can be up to 5 minutes long.
Step 6: Stop Recording
Once you've finished your masterpiece, click Stop.
Don't worry if it wasn't perfect. You can always record again before saving.
Step 7: Review Your Video
Take a moment to preview your recording.
Check:
✅ Audio quality
✅ Video quality
✅ Lighting
✅ Message delivery
Need a do-over? Click Reset Video and try again.
Step 8: Upload a Pre-Recorded Video (Optional)
Already have a video saved?
Click Upload instead of Record and select a video from:
- Your computer
- Cloud storage
- Shared drives
- Downloads folder
No need to record twice.
Step 9: Add a Call-to-Action Button
Once your video is ready, turn on the Button toggle.
CTA buttons appear directly below your video and help viewers take the next step.
Examples:
- Schedule a Meeting
- Visit Our Website
- Donate Now
- Contact Us
- Learn More
Step 10: Add Your Button Text
Enter the message you'd like displayed on the button.
Examples:
- Schedule a Demo
- Learn More
- Request Information
- Email Me
- Shop Now
The preview panel updates automatically so you can see exactly how it will look.
Step 11: Choose Your Button Action
Next, select what happens when someone clicks the button.
Available options include:
🌐 Website Link — Direct visitors to a webpage
📧 Email — Launch an email to your team
📱 Text Message — Allow viewers to send a text
📞 Phone Call — Let viewers call you directly
Choose the option that best supports your campaign goals.
Step 12: Enter Your Destination
Depending on your selected action, enter:
- Website URL
- Email Address
- Phone Number
- Text Message Number
Spokenote automatically connects the button to the action you choose.
Step 13: Customize Button Colors
Match the button to your brand by adjusting:
- Background Color
- Text Color
The live preview updates instantly so you can see your changes in real time.
🎨 Make it look like your brand—not someone else's.
Step 14: Save Your Landing Page
Happy with everything?
Click Save.
A confirmation window will appear reminding you that Dynamic Video and page content cannot be edited after saving.
Select Save one final time and you're done!
🎉 Congratulations—you've officially built your first Spokenote landing page.